


7.19.2012
7.18.2012
Covering patio cushions for less!
I've been a busy bee lately, but with the weather being so wonderful, I squeezed in some time to re-cover my patio furniture cushions! I've been looking online to see about replacing these "specific" cushions that only seem to match my furniture set (La-Z-Boy brand, the Griffin Collection) and I was APPALLED that most sites charge anywhere from $300.00 - $500.00 to replace these custom cushions. Also, I looked at stores that just sell deep seating cushions and they were up to $40.00 a piece for 1 cushion and I have TEN! Outrageous! And who even knows if those would fit exactly like I wanted?! My cushions are about 3 years old and I will say that I haven't taken the best care of them, BUT they WERE an olive green when I bought the set and now they are almost white with a minty tint to them, and all of them include some mildew stains that I have tried repeatedly to remove. So, my bright idea was to try to recover them, and once I started, it really wasn't as difficult as I thought! With a bunch of hours sewing and a fabric bill of about $120.00 (TOTAL FOR ALL 10 cushions), I am super pleased with the results! Here's a walk-through of what steps I took to make new covers that are now REMOVABLE for soaking:
First I measured the cushions to figure out the amount of fabric I would need, so I could buy it all at once (if not, sometimes color can vary between bolts). I ended up choosing a cream colored Waverly Sun N Shade outdoor fabric from JoAnns that you can get when they do their "every other week 50% off" sale, for about $10.00 per yard. Here's the exact fabric I used: Waverly Sun Tile Sun N Shade Outdoor Canvas and then when I completed each cushion I did several coats of Scotch Guard to help prevent water damage and mildew. I chose a light solid because the sun tends to bleach out fabric AND it will be easy to clean up! I've also purchased weatherproof covers from Lowe's that are kind of a generic/cheaper way to avoid future damage!
Things you will need:
fabric
seam ripper
scissors
iron
zippers that correspond with the length of the bottom of each cushion
coordinating thread
sewing machine and/or serger
fabric chalk

Lay your fabric out with your cushion on top and fold it over to measure and basically cut just enough for the edges of the fabric to meet in the middle on the sides.


Now you will serge or sew together the two ends of the fabric that are open on the OTHER side of the zipper. After this step you will have make a base for the cushion. Both serged lines will line up with the bottom seams of the cushion with the zipper running down the middle.

With the wrong side of the fabric still out, you can now slide your cushion into a side (both sides are still open). Make sure your zipper is HALF WAY OPEN so that you can still get your cushion out (after the next step)

Pin both SIDES of your fabric lining them up so that the seam will be running down the MIDDLE of each side. (I like to pin along the side, mark it with a piece of chalk and cut off excess before I run it through the serger.) Pull your cushion out (this might require you to fold the cushion to easily slide it out of the fabric).

 Serge both sides to close them up and then again, insert your cushion into your fabric through the zipper (still wrong side out) and line up the base with the base of the cushion and the side seams with the middle of the sides of the cushion. Then you will pin and the fabric at the top of the cushion to make a seam down the middle of the top. If your cushion is curved, just pin it to the curve and trim. Slide your cushion out again and serge the seam at the top.You should now have a closed casing for your cushion! (please pay no attention to the pins across the top in the next few photos, I did two steps at a time) Only a few more steps....
 One last time insert your cushion into the fabric casing (wrong side out) and we will make the corner seams. My cushion has a curve at the top, so I chose to TUCK some of my fabric into my corner fold rather than cut to the top curve. This made a pleat. I only did that with these two couch cushions, the rest of them got cut to the curve!

This previous photo shows how to mark your corners. This is the top seam (with the pins) and the side seam of the casing. Line the seams up to make a triangle and pin it as close as you can to the corner of the cushion. Do this on ALL FOUR CORNERS. Then you can cut the triangles off with scissors.

Serge or sew these corners shut and flip your finished casing RIGHT side out! (Below is the inside look of a corner!)

Use your seam ripper and scissors to cut off the old nasty fabric from your cushion and insert the foam structure into your new cover!


Here's a before and after shot of how my poor outdoor furniture went from YIKES! to BRAND NEW again!


First I measured the cushions to figure out the amount of fabric I would need, so I could buy it all at once (if not, sometimes color can vary between bolts). I ended up choosing a cream colored Waverly Sun N Shade outdoor fabric from JoAnns that you can get when they do their "every other week 50% off" sale, for about $10.00 per yard. Here's the exact fabric I used: Waverly Sun Tile Sun N Shade Outdoor Canvas and then when I completed each cushion I did several coats of Scotch Guard to help prevent water damage and mildew. I chose a light solid because the sun tends to bleach out fabric AND it will be easy to clean up! I've also purchased weatherproof covers from Lowe's that are kind of a generic/cheaper way to avoid future damage!
Things you will need:
fabric
seam ripper
scissors
iron
zippers that correspond with the length of the bottom of each cushion
coordinating thread
sewing machine and/or serger
fabric chalk
Here we go!
Here's what I'm starting with... yikes! This particular cushion is a back cushion for my loveseat, so it's rectangular, but with a slight curve at the top.
Lay your fabric out with your cushion on top and fold it over to measure and basically cut just enough for the edges of the fabric to meet in the middle on the sides.

The next step you will just be eyeballing... I lined up the bottom edge of the fabric with the bottom of the cushion and made a mark where I wanted to insert my zipper. Your zipper will be the the MIDDLE of the bottom of the cushion. There are tons of YouTube videos and free tutorials on how to insert a zipper into a piece of fabric if you've never done one before. You use your sewing machine to sew it in. The technique I used is making a slit with V's at each end and folding back the fabric on the wrong side and ironing. Then I pin the zipper in place and sew it in. Be very CAREFUL not to burn, melt or over iron your outdoor fabrics if you use this technique!

Wrong side of the fabric lined up with the cushion bottom (with the zipper in the middle of the base of the cushion) measure up where the seam of the cushion bottom is and mark or pin there. You will then either sew or serge this line all the way across parallel to the zipper to make a crease/seam in your fabric.


With the wrong side of the fabric still out, you can now slide your cushion into a side (both sides are still open). Make sure your zipper is HALF WAY OPEN so that you can still get your cushion out (after the next step)

Pin both SIDES of your fabric lining them up so that the seam will be running down the MIDDLE of each side. (I like to pin along the side, mark it with a piece of chalk and cut off excess before I run it through the serger.) Pull your cushion out (this might require you to fold the cushion to easily slide it out of the fabric).


This previous photo shows how to mark your corners. This is the top seam (with the pins) and the side seam of the casing. Line the seams up to make a triangle and pin it as close as you can to the corner of the cushion. Do this on ALL FOUR CORNERS. Then you can cut the triangles off with scissors.

Serge or sew these corners shut and flip your finished casing RIGHT side out! (Below is the inside look of a corner!)

Use your seam ripper and scissors to cut off the old nasty fabric from your cushion and insert the foam structure into your new cover!


Here's a before and after shot of how my poor outdoor furniture went from YIKES! to BRAND NEW again!

BEFORE (can you believe those used to be olive colored?)

AFTER!
The way I chose to do this is not the set way, so as you continue on doing more cushions, you will be able to combine some steps and it will go faster! I'm sure everyone would have their own way of doing this, but I just wanted to share my steps to give you an idea of the way it CAN be done! Now, go try it yourself! - E :)
6.05.2012
Seeking to serge!
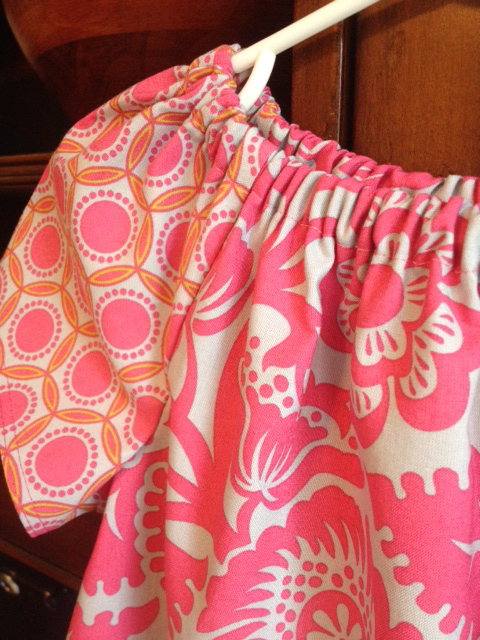
I have tons of fabric from all of these handbags that I make and with a Fall festival coming up in several months, I thought- why not try to make some little dresses to put in my booth? I certainly can't make anything for my two boys with the floral, Spring Joel Dewberry fabrics and birdy patterned Heather Bailey fabric. Never really dabbling in clothing much, I haven't used my fantastic serger (that seals the end of fabric like the inside of most of your clothing), and to be honest, the machine is rather intimidating. Last month I sat down for a few hours just to learn how to thread it.... I'm not huge on reading manuals either. And today, I finally said, "I'm taking my easy as pie pattern from babesofsweet.etsy.com, and I'm going to use this serger!." So, that is what I did. The dress is a little bit altered since I added a ruffle to the bottom, but I'm pretty excited about the finished product! This one is a size 5T :)


5.22.2012
Pretty pillows!!!
Need a little change of scenery for Summer? Re-covering some old pillows and even chair cushions can really give you an inexpensive, new look!


5.08.2012
Teacher gifts!
Unsure what to do for the end of the year teacher gift? Well, put gift cards out of your mind and try this project with your little ones! Find some inexpensive, bright, Spring potters at your local craft store. You can even use a coffee mug, Tervis tumbler, etc. as your planter. Buy some Sharpie permanent PAINT pens (also at your craft store) and write the teachers name on one side of your container. On the other side write "Thanks for helping me to grow!" or something similar. Then purchase perennials (or let your child pick out what flower they want for their teacher) and plant the flowers in the containers together! This was so much fun and my little boys loved playing with the dirt!!
.JPG)
.JPG)
4.18.2012
Graphics galore...And some sweet peeps!
Well, the past few weeks, a machine has been running, but it's not my sewing machine! It's my CPU! I've had THE most creative and wonderful ladies to work with on graphics, business cards, tags, banners, blogs and even PATTERNS! Thanks to a group on Facebook called Made By Mommies, I've met and connected with talented ladies that have MUCH more experience with making pretties on their sewing machines than I do. But they've been keeping me busy in Illustrator and that's my favorite thing to do!!! So, this post is basically just to give a little shout out to those wonderful people and their shops- and if you LOVE hand-made clothing and other items, you'll definitely want to check them out!


I always love this little lady and she's got a new line out this week (it's SELLING OUT!)
And this sweet gal let me add a column to her blog this week for her- amazing clothes!
Meagan is the "mama goose" of the sewing circle... always in the know!
Right now I'm working with fabulous Charlee Madison- check out her new line CITY LOVE!
And I'm going to throw Hilary in here too- she does it ALL! Fabrics, bags, kids items!
3.12.2012
My First Pattern - The Finch Wallet
This will be available for purchase at easelyerin.etsy.com AND on Craftsy.com. What a long road this was to make this pattern. But it turned out great and I hope a lot of beginning sewers take the time to try it!


Subscribe to:
Posts (Atom)